Publishing on Blog*Spot is the fastest and easiest way to use all of
Blogger's great features. (And for free, no less!) If you don't care to
have
216.239.32.21
216.239.34.21
216.239.36.21
216.239.38.21
Your DNS setup is now complete!
 If you're publishing on Blog*Spot, you'll see a link near the top
offering to switch you to a custom domain. Go ahead and click that link.
If you're publishing on Blog*Spot, you'll see a link near the top
offering to switch you to a custom domain. Go ahead and click that link.
 The Blog*Spot Address setting now changes to Your Domain. Fill in the domain you registered, and then save your settings.
 Now the only thing left to do is to tell everybody about your new address!
Notes:
blogspot.com in your blog's address, though, you can
get a domain of your own. We'll continue to host all your content as
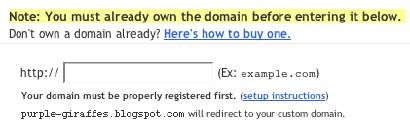
before, but it will be displayed at your new address.Choose and Register Your Domain
The first thing you'll need to do is to choose a domain name, likeexample.com and register it. You can register domain names from any of a number of different registrars,
and you can use .com, .org, .net or any other valid addresses.
Remember: you only need to get the domain name; you don't have to pay
extra for hosting service. The easiest way to register a domain is to buy your domain directly through Blogger.
If you go this route, we'll automatically configure all of your
relevant DNS settings and attach your new domain to your existing blog
immediately.Update the DNS Settings
DNS stands for Domain Name System, and a DNS server determines what site a given address takes you to. So far, you have a domain name but none of the servers on the internet know what to do with it yet. To take care of this, you need to do two things:- Create a CNAME record for your blog's address, which should be a subdomain of the form
www.example.com.
- To create a CNAME record for your domain with the DNS, associating your domain with:
ghs.google.com.The exact procedure for doing this varies depending on your domain registrar, but you can find instructions for many common registrars here. If yours isn't listed, or if you run into other difficulties, you can contact your registrar directly and they'll be able to help you out.
- Create 'A' NAME records for your naked domain (
blog.com)Note: The following information applies to naked domains only!! If you're setting up a subdomain then this does NOT apply to you! :-)
- Creating A records for your naked domain is important as it allows Google to redirect people who use in your naked domain name (
blog.com) to your blog page (www.example.com). If you do not do this, visitors who leave off the www will see an error page.- There are four separate A records you will create, and can be done
from the same control panel you accessed your CNAME records. Simply
point your naked domain (
example.com, without the 'www') to each of the following IP addresses:Update Your Blogger Settings
Almost done! At this point, you have a domain name, and the DNS servers know to direct people to Google when they want to see your blog. But Google hosts lots of blogs, so we have to make sure the right one is associated with this domain. You'll do this on the Settings | Publishing tab for your blog in Blogger.
If you're publishing on Blog*Spot, you'll see a link near the top
offering to switch you to a custom domain. Go ahead and click that link. The Blog*Spot Address setting now changes to Your Domain. Fill in the domain you registered, and then save your settings.
 Now the only thing left to do is to tell everybody about your new address!
Notes:
- If your new domain isn't taking you to your blog, wait another day or two to make sure all the DNS servers have been updated. If it still isn't working, contact your registrar to make sure you entered the DNS settings correctly.
- Your original Blog*Spot address will automatically forward to your new domain. That way, any existing links or bookmarks to your site will still work.
- You can use this feature with domains (e.g.
example.com) or subdomains (e.g.blog.example.com). However, you cannot specify subdirectories (e.g.example.com/blog/) or wildcards (e.g.*.example.com). - Your posted images will continue to display on your blog as described here.